(Firstly, I am quite aware that today is Tuesday and nearly Wednesday, and not my usual Monday blog post. My days got swapped this week, so I'm hoping this still counts as being on schedule!)
I'm nearly finished sketching Chapter One for Little Raindrop's first book. It has been a journey, figuring out how I want to illustrate it, but it has been a fun journey for sure! I was set back a few months with classes last fall, simply because I underestimated the amount of time I needed for homework. Lesson learned!
Although I can't share all the pages I've completed, I can share how I am doing it, and how I came to this method of drawing.
 The Research
After reading the manuscript and sketching out some basic ideas, the author and I came to the conclusion that this book would be better formatted for a graphic novel, versus a traditional chapter book or even picture book. And then after gathering a collection of books together to use for reference, I was further convinced that Little Raindrop was destined to be a graphic novel/journal.
 The books I used for reference became valuable tools throughout the entire creative process. I measured and compared book sizes, the fonts, the word count, the layouts, the margins, the age groups, the art styles, and even the fun activity pages! Here is my pile of books I've used for reference so far:
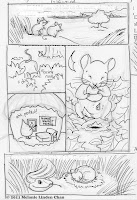
Also, because I am working on a book that is about nature, I have to research each new animal that I am not used to drawing. It needs to be scientifically accurate, even though the style is balanced between cartoon and realistic. So once I plot the layout of the page, I draw in my sketchbook to get a better feel for the animals, and then I draw them in on the page I am working on.
The Testing of Technique and Methods
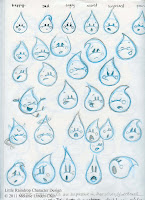
 Before I began sketching, I had to figure out which character style to use! I preferred drawing Little Raindrop one way, and the author preferred him drawn another way. I sketched up a few pages of character art, and after getting feedback from children and adults alike, I found the final character!
After I drew the art that landed me the job, I re-evaluated my methods. The double page spread of the River Habitat was very time consuming, and there way no way I could finish the entire story in a timely manner using that style. I had drawn the lines with pen and ink, painted a value study/under painting in sepia tones, filled in the color with watercolor, and touched it all up with colored pencil. This book is going to have about six chapters, so I decided one full color double page spread per chapter would turn out nicely, if done correctly.
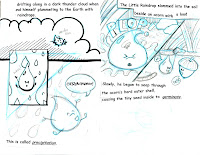
 This means the rest of the book would be in black and white line, perhaps with some shading and a splash of blue here and there. I decided against using my usual pen and ink method, which is not only time consuming but is also messy. I'm always on the go, and I take my art supplies with me everywhere. I needed to find something clean and easy to use. And so I re-discovered the Micron pen!
So I sketched up a few pages in my blue pencil, and drew in the final lines with Microns. Then I scanned them and added text using Photoshop. It didn't look clean enough for my liking. I preferred the bold lines of vector images, but I am no pro using vector lines and shapes. I have this little program that turns my bumpy looking line work into nice vector lines, called Vector Magic. Well, once I cleaned up my scans and put them through Vector Magic, and imported them into Photoshop, I started to get really excited! This method looked much cleaner, smoother, and bolder.
But how was I going to color it? I couldn't use a fill bucket, for goodness' sake... it just didn't look right. Plus, I truly hate painting digitally. There may come a time when I learn to enjoy and excel at it, but for now I need the real brush and paint to make me happy.
I sent an email to some of my smarty pants arty friends, and they rescued me by sharing their knowledge about levels and multiplying layers. Once I fiddled with the settings, I knew just what to do. I needed to make a sandwich! A sandwich of Photoshop layers, using bold lines on the top and my scanned painted art.
I truly like the new final method. Sketching and then re-drawing the final lines onto watercolor paper, painting in a tonal wash and scanning it, turning it vector and sandwiching it all with three different blues. And then painting traditionally for those select, special spreads.
So now you know how it's being done! I can't share the text, or all of the art as I work on it. (You silly goose, you!) But every once in a while you'll get to see what I'm working on, and I can share my epiphanies, if any. And even though I can't spend as much time as I would like to, due to my "day" job at the restaurant, I'm still having a lot of fun drawing and painting in between!
Thanks for reading! See you next Monday!
~Melanie


AMAZING MELANIE!! I love this new style, and can't wait to see more. I love how thorough your research is - really impressive!
ReplyDeletexx C
Thank you, Caroline!
ReplyDeleteI'm doing my best to keep it clean and quick work, because there are a LOT of pictures going into this story! Fingers crossed that it will turn out the way I plan!